Scanning Stamps & Re-entries
(Updated)
Return to Index Return to Listings Page
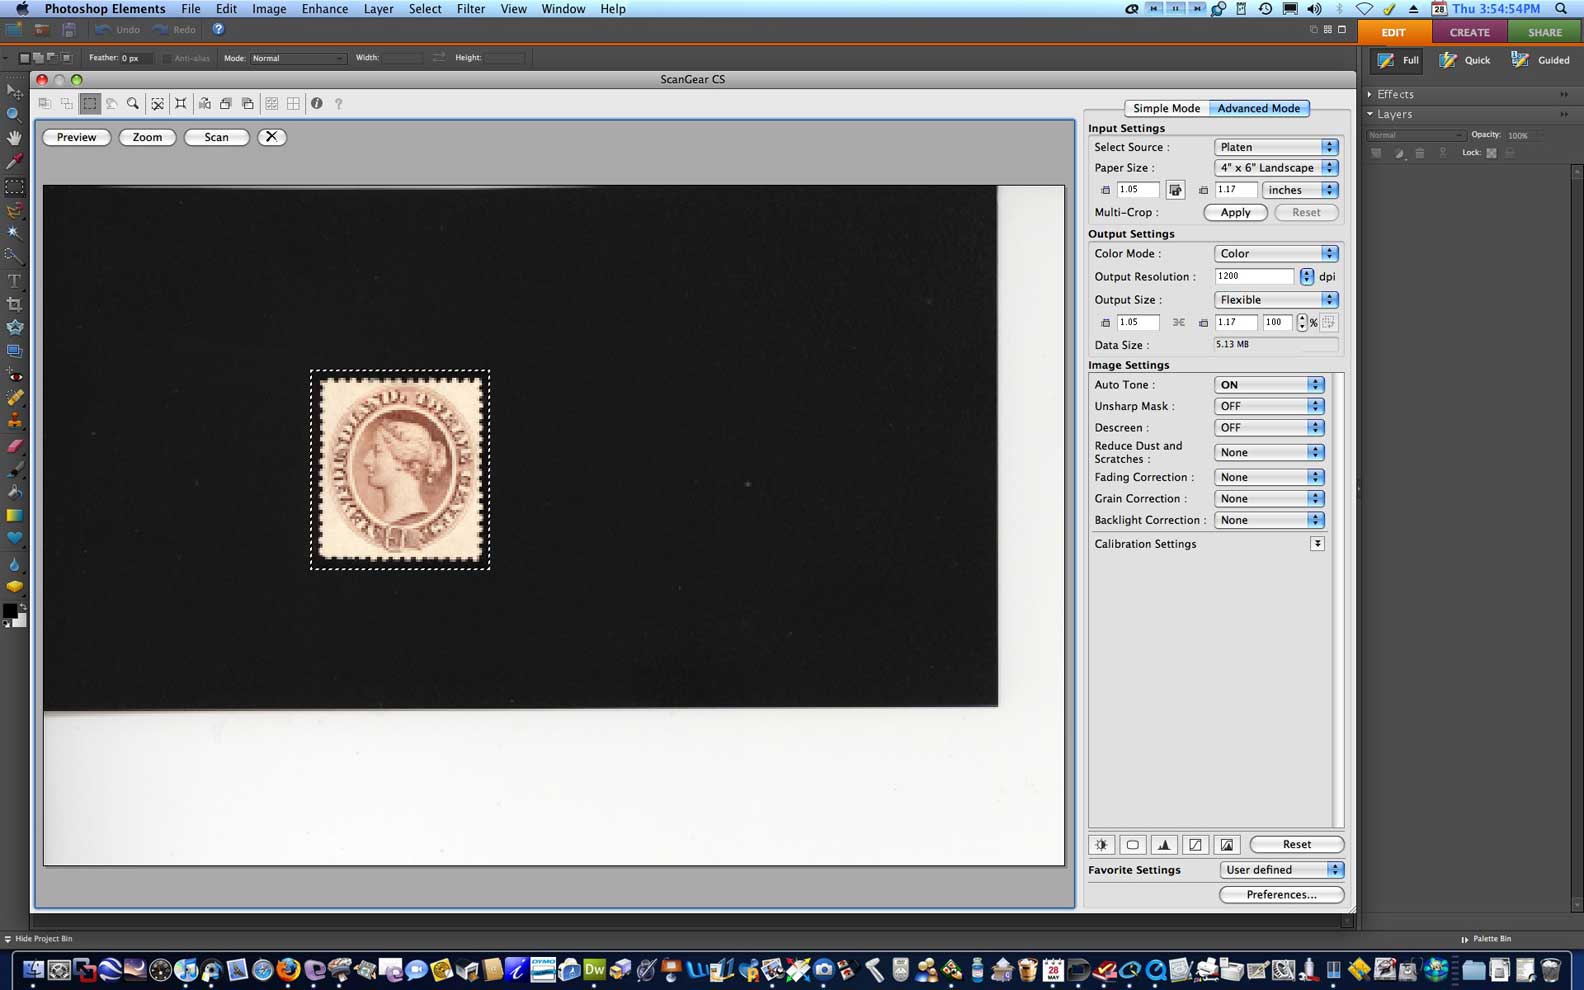
I am often asked the settings I use when scanning stamps and re-entries for my website. I now use an Epson Artisan 835 Photo scanner with VueScan Pro software. I set my 'paper size' to 4" X 6" (about the size of a postcard). This way, you are not scanning a full size 8 1/2" by 11" sheet, which is a complete waste of your time. For most purposes I scan at at least 1200 dpi at actual size (100%). I always do a Preview scan first, after which I crop the image fairly closely. If the Preview scan image is crooked, leave more space around the image when cropping to allow for straightening later. My Preview scan is set in my Preferences for 75dpi, which is fast, and this is why the image below looks blurry. Since this is strictly for 'composing' the scan and cropping, it doesn't matter that this image is blurry...the final scan will be fine. Once I have done a rough cropping, I then click SCAN. When the scan is finished, VueScan Pro automatically opens it in my Mac’s Preview software, where I can immediately tell if the scan is satisfactory. I then open the images in Photoshop Elements 15 (or whatever version is the latest). Using Photoshop Elements, I then straighten the scan. Once straightened, I then crop the image further and allow just a little even border around the edges. (The illustration below is from my old setup and software, but most scanning software is very similar.)
Having saved the image, this is where I often apply the Auto Contrast filter to brighten up the image colour a little, and then I apply the Sharpen filter to bring out fine details. (If the colour is still ‘off’ then I usually try some of the other filters available in Photoshop Elements to bring the colour closer to that of the actual stamp. Red stamps are particularly tricky, often ending up with somewhat of a bluish cast to them.) Then I resize the image for my web pages (now 15" wide - for eBay you could choose 4” or 6” to give good, clear photos) and reduce the resolution to 72 dpi. (This is why my images may look great on the screen, but if you've ever saved one and tried to print it, it looks very pixelated/blurry.) Finally, I use Photoshop Elements 15's 'Save for Web...' feature, which further reduces the size of the file for much faster loading on my site. For example, it usually reduces a file of around 1200K to 250K, without any really noticeable deterioration in the appearance on screen, enabling the image to load very much faster on your screens than if I had used the full resolution scan, but it still looks great. All of this is done to a copy of the scan, so I can easily go back to the high-resolution original and crop out areas I want to show in extreme close-up views. This is how I show only the corner numeral box, or parts of the lettering, etc. (Recently I have been using a separate computer microscope for close-up work.) Just remember to always keep an untouched copy of the original scan, so you can always go back to it whenever you need to. With the huge hard drives in computers nowadays, this is not a problem.
Of course, the software you use is likely different, but the settings are pretty well universal. The image you see above is the Preview screen of my old ScanGear GS software before I actually do the final scan of the stamp, and the settings are on the right. Notice that I have cropped the image fairly closely. If the preview shows the stamp to be a little tilted or twisted, I leave a little more space around it which allows me room to straighten the final scan if it's a little off. I also prefer a black background to white. I believe a white background throws off the colour balance when doing any adjustments and I think the images on my web pages look so much better on a black background.
You may have different methods than what I have described here, but this works for me. The thing is, when working with digital images, you can play around and experiment as much as you like to get the kinds of results you are after. The only thing it takes is time. However, if you do tend to try a lot of things, you might want to take notes, so you don't arrive at that perfect image and not know how to repeat it. This was also learned the hard way! ;)
SUMMARY:
- set scanner to 1200, 1800 or 2400 dpi at 100%
- do a preview scan (pre-scan) and crop image fairly closely if straight
- scan, then open in image processing software* (I prefer Adobe's Photoshop Elements* - It will do anything you need to do and is FAR less expensive than the full edition of Photoshop.)
- SAVE the image to your hard drive, giving it a unique name that helps you to recognize each scan
- to a COPY of your original scan, apply any filters you wish to use: auto contrast, adjust colours, brightness, etc.
- resize to the width you want (the larger the better) and reduce resolution to 300dpi for printing, or 72 dpi for posting on the Internet
- name and save file as medium quality JPEG file
- use SAVE FOR WEB... option to further reduce size for smaller files and faster opening
- the resulting scans will look GREAT on screen, although they will not print very well
- for printing, when resizing original scan, reduce to no less than 300 dpi, or print at the original 1200dpi
***NOTE: If you are scanning stamps to send to ME to examine, simply crop the pre-scan fairly closely, leaving more space around it if it comes out crooked, then scan at 1200, and email me the original raw image! Do NOT process it in any way. Also, it REALLY helps me to keep track of all the scans I receive if you start the names of your scans with your last name. This way I can give proper credit if I use your scan on my website. e.g Smith_Sc75_re_RNB.jpg or Smith_USA_Sc300_major.jpg. If it is a Canadian stamp, there is no need to identify it as such, but for other countries or provinces, please put an abbreviated form immediately after your last name. e.g. Smith_nfld_Sc28_pp25.jpg; Smith_NZ_Sc493_full.jpg, etc. This last step is VERY important!***
Happy Scanning!
***************************************************************************************
***ADDITIONAL INFO***
At the request of a couple of correspondents, I am adding the following message that I recently wrote to a friend who was having some difficulty getting a good scan. While it is a little long, you might find it useful...
************************
OK, here is an EXTREMELY important tip when it comes to scanning stamps...
NEVER NEVER NEVER NEVER NEVER NEVER NEVER NEVER NEVER NEVER NEVER try to enlarge a low-resolution image AFTER scanning it!
ALWAYS scan at the highest OPTICAL resolution possible FIRST and THEN you can REDUCE it if necessary.
Taking a scan with a set number of pixels and trying to enlarge it only makes those same pixels larger - you cannot add any detail not already present in the original scan.
Most fairly recent scanners will let you make 1200dpi fully optical scans - don't try going above the optical resolution of your scanner, as anything above that is interpolated, or guessed at, by the software (the software in effect guesses at the details between the pixels and adds them, with no idea what they actually are). Scanners that advertize 9600dpi or 12,000dpi, almost always do so by interpolating the data. Only the top of the line, very expensive scanners can give such high resolution optically. (The box your scanner came in, or the manual should tell you the OPTICAL resolution, as well as the interpolated resolution.) If yours only goes up to 600dpi, use that. If your software allows you to change the SCALE % when scanning, use some combination to get to 1200dpi. (1200dpi at 100% - actual size - is the normal.) For example, 600dpi at 200% equals 1200dpi; 300dpi at 400% equals 1200dpi; 400dpi at 300% equals 1200dpi; etc. I have found that 1200dpi is IDEAL for stamp images, at least for MY purposes. Any higher is overkill.
ALWAYS do a pre-scan or preview scan first. Then crop the image closely in the pre-scan before doing the actual scan. If the image is crooked, leave more space around it to allow for straightening later.
THEN do the final scan, making sure any software 'extras' are turned off - things such as auto toning, dust removal, screening, etc., all adds to the time it takes to scan, and if your glass is clean, is not needed. (Of course, this applies to scanning stamps. If you are trying to restore an old photograph, these other features are highly desireable!)
IMMEDIATELY save your scan to your desktop or a specified folder on your hard drive, giving it a name you will recognize (eg. RH_Sc108_re_full.jpg). That could be for a Rhodesia_Scott_#108_re-entry_full_stamp.jpg, but takes up a lot less space and is easier to handle.
SAVE the image file as a JPEG (jpg) at its highest quality setting - maximum detail.
ALWAYS use a COPY of this file for any further 'processing' such as re-sizing, colour tweaking, sharpening, etc. That way, if you muck it up, you always have your original to go back to.
USE that raw 1200dpi file to email to someone, such as me, so that it still contains ALL of the data captured by the scan. That way, I can blow it up on my screen and see every detail without it pixellating or getting blurry.
If you plan to PRINT the image (on photo paper, or in a newsletter, etc.), you can then REDUCE the size of the image in your software to no less than 300dpi, or print it at the full resolution if you wish.
If you plan to simply VIEW the image onscreen (on a web page, for example), you can resize the image file as low as 72dpi (or 96dpi, depending on your screen). For my website, I now usually save the images at 15 iinches wide at 72dpi. This makes for a smaller file size and faster loading on a slow connection, but still appears crisp and clear.
I then further OPTIMIZE the image in Photoshop Elements 15 for the web as a medium quality jpeg, using the Save for the web... option. This image is the one I add to my web pages and upload to my web host. They look great onscreen (the whole point of my website), but if saved from the web and printed, they look terrible.
Usually, before doing the above adjustments to my scans, I adjust the colour slightly of the raw image by applying the AUTO CONTRAST filter in Photoshop Elements 15. That's usually all it takes to make the image just right - to my eyes, anyway. Some stamps and some colours need more work, even with a good clear scan, but working with a COPY of your original makes sure you can always toss it and start over, if necessary. And it doesn't cost you anything but time.
Of course, if you are putting a re-entry collection together, you will want to keep full 1200-2400dpi scans in a file, so you can refer back to them at any time. Make sure to give them full, clear names so you can identify them quickly and easily, without having to open a dozen or more scans to find the one you want.
end